aws-sdkというgemのバージョンアップをした
昨日あるアプリに入っているasw-sdkというgemのアップデートを行いました。(まだステージングのみ)
aws-sdkはAmazon S3、Amazon EC2、DynamoDB など、AWS の多くのサービス向けの Ruby クラスを提供してくれるgemです。
Amazon S3のAWS署名バーション2が2019年6月24日に廃止されるため、バージョン3以上にアップデートする必要がありました。
以下のリンクはそのgemです。
今後またgemのバージョンアップをすることがあると思うので行なった手順のメモをしておきます。
手順 (ローカルでバージョンアップ)
①そのままの状態でテスト全部通ることを確認
②Gamfileでaws-sdkの3系以上を指定してbundle update
今回はGemfile内で以下のように指定しました。
意外とたくさんのgemにも関連していたようで、新たなgemがたくさん入りました。
③テスト実行して落ちた場所確認
大量にテストが落ちましたw
④どこに影響出ているかあたりをつけコード修正
今回は config/initializers/aws.rb に
Aws::VERSION = Gem.loaded_specs["aws-sdk"].version
と追記しました。
⑤テスト全部通ることを確認
⑥aws-sdkが使われている場所を探す
全ファイル検索等駆使してaws-sdkが使われている起点を探します。
そこからコードを追っていき流れを把握します。
⑦ブラウザで確認し、うまく動くか確かめる
これで大丈夫そうでしたらステージング環境へのデプロイに進みます。
手順(ステージングへデプロイ)
①sshで接続する
このコマンドでsshでステージング環境のアプリに接続します。
②.envやデータの確認
sshで接続したら、.envファイルの確認やデータの確認をします。
/var/www/アプリ名/current配下にアプリ本体が置いてありました。
.envファイルは/var/www/アプリ名/shared/.envに置いてありました。
③コンソールでデータを確認
sshで接続した時railsコンソールを立ち上げる際は以下のコマンドで立ち上がります。
実際にデータ弄るのは心配というときは以下のように--sandboxオプションをつけてあげるとコンソールをexitで出た後、行なった処理がロールバックされるので安心です。
RAILS_ENV=staging bin/rails c --sandbox
④デプロイチェック
以下のコマンドでデプロイが正常にできるか確認します。
bundle exec cap staging deploy:check
⑤デプロイ
大丈夫そうだったら以下のコマンドでデプロイを実行します。
bundle exec cap staging deploy
感想その他
この手順は今後も行う機会が出てくると思いうのでしっかり覚えて使いこなせるようになろうと思います!!
sshをもっとマスターしたいです!
Everyday Rails - RSpecによるRailsテスト入門の輪読会をした
本日はTamarbで、「Everyday Rails - RSpecによるRailsテスト入門」の輪読会をしました!
この本は以前一度読んだことがありましたが、理解しきれていない部分も多く、とても勉強になりました!
この本にはサンプルアプリケーションが用意されており、それを動かしながらRSpecの練習をすることができてとても楽しいです!
各章ごとにブランチを分けてくれているため、取り組みたい場所から手をつけることもできて便利です!
また、経験豊富な先輩方から本にはのっていないお話などもお聞きすることができました!
具体的には、以下のようなお話がありました!
- 「describeのネストは五段以下にするのが読みやすい、Rubocopの標準設定でもそうなっている」
- 「Simple COVなどでガバレッジ測定する」
- 「ガバレッジ90%以上は最低でも満たしたい」
- 「モデルのテストでバリデーションエラーになるかは書いてもエラー文の内容までは書かない」
- 「現在バリデーションのエラーメッセージはハッシュだけどRails6か6.1からはオブジェクトになるので、エラー文の内容までテストを書いてもテストが壊れにくくなる」
- 「satisfyマッチャーを使えばブロックでどんな内容のテストでも書ける(※可読性は下がるよ)」
- 「読みやすいテストにするために、複雑な部分をfactoryに持たせたり、テストの行数が多くなってもletやbeforeを減らすのもあり」
- 「feature specとsystem specは同じ書き方できることが多いがsystem specはdatabase cleanerを使わなくてもデータを綺麗にしてくれる」
- 「beマッチャはインスタンスが同じかまでチェックするがeqマッチャは値が同じかだけチェックする」
他にも色々ためになるお話がありました!!
業務でも活かして行きたいです!!
Could not locate device support filesというエラー
エラー内容
XcodeでiOSアプリをビルドしようとしたら以下のようなエラーが出ました。
Could not locate device support files
This iPhone 6 is running iOS 12.2 (16E227), which may not be supported by this version of Xcode.
調べてみたら、どうやらXcodeがiOS12.2のバーションに対応していないことが原因のようでした。
解決方法
解決するには、以下のページからiOSのバージョンのzipファイルをダウンロードし、解凍したフォルダを
/Applications/Xcode.app/Contents/Developer/Platforms/iPhoneOS.platform/DeviceSupport/
配下に置いてあげます。
その後Xcodeを一旦閉じて、再起動すればビルドできるようになります!!
ngrokを使ってみた
ngrokというローカル環境を外部に簡単に公開できるツールを使用しました!
使い方や途中詰まった部分について書いておきます!
ngrokとは
ローカル環境を外部に簡単に公開できるようにしてくれるツールです。
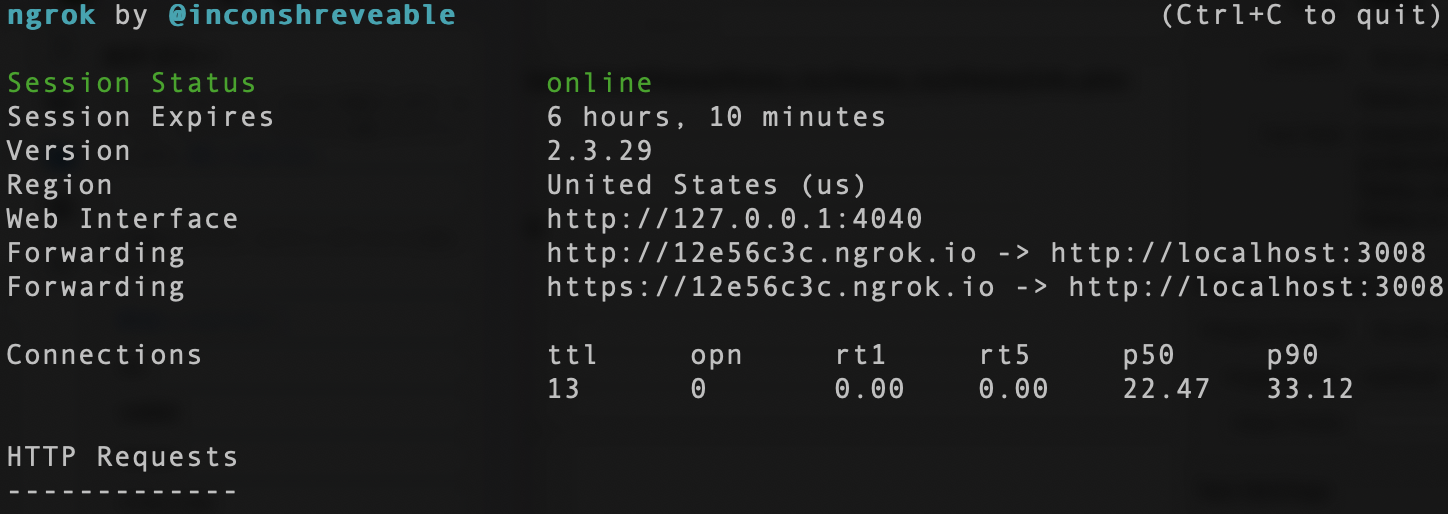
以下のようにngrok http 3008とコマンドを実行すると、以下のような画面がターミナルで立ち上がります。
そして現在 localhost:3008で動いているアプリが、発行されたアドレスで外部からも見れるようになります!!
こちらからngrokをダウンロードできます!
インストール方法
①ダウンロード
上に貼ったサイトからzipファイルをダウンロードします。
②ジップファイル解凍
ダブルクリックなりunzipコマンドなりで解凍します。
解凍するとngrokというファイルが出てきます。
③解凍したngrokファイルをusr/local/bin/配下に移動させる
ngrokコマンドがそのままだと使えないので、
ngrokファイルをusr/local/bin/配下に移動させます。
(公式サイトや他の記事には書いてなかったので私の環境だけかもしれません)
④ngrok http 3008を実行
あとは以下のコマンドを実行すれば外部からローカル環境を見るためのアドレスが発行されます!
ngrok http ポート番号
感想その他
ngrokコマンドが使えるようにするためにすこし手こずりましたw
便利そうなのでまた今度個人的にも使っていこうと思います!
gem作りの練習
昨日マキさんとお話した際にgem作りの話をしました。
また、その流れで初めは小さく簡単なものから作っていき、人からのフィードバックをもらいながら改善していくのが良さそう、という話もしました。
そこで、自分もまず実用性は完全に無視してとりあえずgemを作ってみることにしました。
作り方については以下の記事をチュートリアルとして参考にさせていただきました。(作り方については以下のリンクを見ればわかるのでここでは書きません)
以下が完成してリリースしたものです。

感想その他
全然使い道のないgemですが、今回作ってリリースまでの流れをやってみたことで、gem作りへの心理的なハードルは少なくなりました。
今後、いいアイディアが浮かんだらちゃんとしたgemを作ります!
libv8というgemのインストールが失敗する
エラー内容
Ruby3系のバージョンで作られたRailsのプロジェクトを動かしたかったので、
環境構築後bundle installをしたら以下のようなエラーが出てしまいました。。。
libv8 というgemのコンパイルで失敗しているようでした。
Installing libv8 3.16.14.15 with native extensions
Gem::Ext::BuildError: ERROR: Failed to build gem native extension.

  current directory: /Users/hayashiyoshino/.rbenv/versions/2.3.0/lib/ruby/gems/2.3.0/gems/libv8-3.16.14.15/ext/libv8
/Users/hayashiyoshino/.rbenv/versions/2.3.0/bin/ruby -r ./siteconf20190515-89699-1kv0iuy.rb extconf.rb
creating Makefile
Applying /Users/hayashiyoshino/.rbenv/versions/2.3.0/lib/ruby/gems/2.3.0/gems/libv8-3.16.14.15/patches/fPIC-for-static.patch
Applying /Users/hayashiyoshino/.rbenv/versions/2.3.0/lib/ruby/gems/2.3.0/gems/libv8-3.16.14.15/patches/do-not-imply-vfp3-and-armv7.patch
Applying /Users/hayashiyoshino/.rbenv/versions/2.3.0/lib/ruby/gems/2.3.0/gems/libv8-3.16.14.15/patches/disable-building-tests.patch
Applying /Users/hayashiyoshino/.rbenv/versions/2.3.0/lib/ruby/gems/2.3.0/gems/libv8-3.16.14.15/patches/disable-werror-on-osx.patch
Applying /Users/hayashiyoshino/.rbenv/versions/2.3.0/lib/ruby/gems/2.3.0/gems/libv8-3.16.14.15/patches/do-not-use-vfp2.patch
Compiling v8 for x64
Using python 2.7.10
Using compiler: c++ (Apple LLVM version 10.0.0)
Unable to find a compiler officially supported by v8.
It is recommended to use GCC v4.4 or higher
Beginning compilation. This will take some time.
Building v8 with env CXX=c++ LINK=c++  /usr/local/bin/gmake x64.release ARFLAGS.target=crs werror=no
GYP_GENERATORS=make \
build/gyp/gyp --generator-output="out" build/all.gyp \
              -Ibuild/standalone.gypi --depth=. \
              -Dv8_target_arch=x64 \
-S.x64  -Dv8_enable_backtrace=1 -Dv8_can_use_vfp2_instructions=true -Darm_fpu=vfpv2 -Dv8_can_use_vfp3_instructions=true
-Darm_fpu=vfpv3 -Dwerror=''
gmake[1]: Entering directory '/Users/hayashiyoshino/.rbenv/versions/2.3.0/lib/ruby/gems/2.3.0/gems/libv8-3.16.14.15/vendor/v8/out'
CXX(target)
/Users/hayashiyoshino/.rbenv/versions/2.3.0/lib/ruby/gems/2.3.0/gems/libv8-3.16.14.15/vendor/v8/out/x64.release/obj.target/preparser_lib/src/allocation.o
warning: include path for stdlibc++ headers not found; pass '-std=libc++' on the command line to use the libc++ standard library instead
[-Wstdlibcxx-not-found]
In file included from ../src/allocation.cc:33:
../src/utils.h:33:10: fatal error: 'climits' file not found
#include <climits>
^~~~~~~~~
1 warning and 1 error generated.
gmake[1]: *** [tools/gyp/preparser_lib.target.x64.mk:126:
/Users/hayashiyoshino/.rbenv/versions/2.3.0/lib/ruby/gems/2.3.0/gems/libv8-3.16.14.15/vendor/v8/out/x64.release/obj.target/preparser_lib/src/allocation.o]
Error 1
gmake[1]: Leaving directory '/Users/hayashiyoshino/.rbenv/versions/2.3.0/lib/ruby/gems/2.3.0/gems/libv8-3.16.14.15/vendor/v8/out'
gmake: *** [Makefile:195: x64.release] Error 2
/Users/hayashiyoshino/.rbenv/versions/2.3.0/lib/ruby/gems/2.3.0/gems/libv8-3.16.14.15/ext/libv8/location.rb:36:in `block in
verify_installation!': libv8 did not install properly, expected binary v8 archive
'/Users/hayashiyoshino/.rbenv/versions/2.3.0/lib/ruby/gems/2.3.0/gems/libv8-3.16.14.15/vendor/v8/out/x64.release/obj.target/tools/gyp/libv8_base.a'to
exist, but it was not found (Libv8::Location::Vendor::ArchiveNotFound)
 from /Users/hayashiyoshino/.rbenv/versions/2.3.0/lib/ruby/gems/2.3.0/gems/libv8-3.16.14.15/ext/libv8/location.rb:35:in `each'
from /Users/hayashiyoshino/.rbenv/versions/2.3.0/lib/ruby/gems/2.3.0/gems/libv8-3.16.14.15/ext/libv8/location.rb:35:in
`verify_installation!'
                                                                                                                  from /Users/hayashiyoshino/.rbenv/versions/2.3.0/lib/ruby/gems/2.3.0/gems/libv8-3.16.14.15/ext/libv8/location.rb:26:in `install!'
 from extconf.rb:7:in `<main>'

extconf failed, exit code 1

Gem files will remain installed in /Users/hayashiyoshino/.rbenv/versions/2.3.0/lib/ruby/gems/2.3.0/gems/libv8-3.16.14.15 for inspection.
Results logged to
/Users/hayashiyoshino/.rbenv/versions/2.3.0/lib/ruby/gems/2.3.0/extensions/x86_64-darwin-18/2.3.0-static/libv8-3.16.14.15/gem_make.out

An error occurred while installing libv8 (3.16.14.15), and Bundler cannot continue.
Make sure that `gem install libv8 -v '3.16.14.15' --source 'https://rubygems.org/'` succeeds before bundling.

In Gemfile:
  therubyracer was resolved to 0.12.2, which depends on
    libv8
解決方法
どうやらMac OS Mojaveだとlibv8というgemのビルドに失敗してしまうようです。
libv8はtherubyracerというgemに関連して必要なgemのようです。
therubyracerはV8というGoogleが開発するJavaScript実行エンジンをRubyで使えるようにしてくれるもののようです。
3系のv8を入れてあげたのち、それをビルドするとlibv8もインストールできるようになるという情報があったので、まず3系のv8をインストールします。
(develop|✚1) [1] $ brew install v8-315
Updating Homebrew...
         ==> Auto-updated Homebrew!
Updated 3 taps (homebrew/core, homebrew/cask and homebrew/services).
  ==> New Formulae
allureofthestars          cfn-lint                  cypher-shell              ktlint                    pipx
appstream-glib            cpp-gsl                   gcc@8                     leela-zero                proteinortho
boringtun                 cubelib                   itk                       otf2                      scws
==> Updated Formulae
imagemagick ✔                              grpc                                       netcdf

  略

==> Deleted Formulae
js-test-driver                  minisat                         node@6                          typesafe-activator

==> Downloading https://homebrew.bintray.com/bottles/v8@3.15-3.15.11.18_1.mojave.bottle.tar.gz
==> Downloading from https://akamai.bintray.com/38/38ef56c652ac4f91ec1ddac61b8719ffba4c949103a6636e15aa1cd768e2d14d?__gda__=exp=1
######################################################################## 100.0%
==> Pouring v8@3.15-3.15.11.18_1.mojave.bottle.tar.gz
==> Caveats
v8@3.15 is keg-only, which means it was not symlinked into /usr/local,
  because this is an alternate version of another formula.

  If you need to have v8@3.15 first in your PATH run:
                                                   echo 'export PATH="/usr/local/opt/v8@3.15/bin:$PATH"' >> ~/.bash_profile

For compilers to find v8@3.15 you may need to set:
  export LDFLAGS="-L/usr/local/opt/v8@3.15/lib"
  export CPPFLAGS="-I/usr/local/opt/v8@3.15/include"

==> Summary
🍺  /usr/local/Cellar/v8@3.15/3.15.11.18_1: 22 files, 152MB
システムのv8を参照するように設定します。
(develop|✚1) $ bundle config --local build.libv8 --with-system-v8
You are replacing the current local value of build.libv8, which is currently nil
ビルド時に3系のv8を参照するように設定します。
(develop|✚1) $ bundle config --local build.therubyracer --with-v8-dir=(brew --prefix v8-315)
You are replacing the current local value of build.therubyracer, which is currently nil
この後、bundle installをしてあげると無事インストールされるようになりました!!
、、、となるはずでしたが、今度はmysqlの部分でコケましたw
mysqlも入るように修正したら今度こそ全てのgemがインストールされました!!
感想その他
ビルドやら環境によるエラーって難しいですねw
https://qiita.com/shimx/items/32e85093f21e673c7127 この記事書いてくれた方に感謝です!!
accepts_nested_attributes_forを使った時のrequest specでのパラメータ指定
問題
menuを作成するrequest specでパラメータ の指定の仕方がおかしかったようで、テストが落ちておりました。
menuモデルでは,
accepts_nested_attributes_for :menu_images
というようにmenu_imagesを子レコードとして作成するようにしておりました。
以下は落ちてしまっていたテストです。
context '店舗ログイン' do
    it "create" do
      sign_in no_menu_restaurant.restaurant_user
      post restaurant_menus_path, params: { menu: FactoryBot.attributes_for(:menu, :with_menu_images, restaurant_id: no_menu_restaurant.id) }
      expect(response).to have_http_status(302)
      expect(response.location).to eq(restaurant_menu_url(Menu.find_by(restaurant: no_menu_restaurant).id))
    end
  end
end
テスト実行結果
(modify/menu_image_create|✚1) [1] $
docker-compose run --rm app bundle exec rspec spec/requests/restaurant/restaurant_menus_spec.rb
Failures:
1) Restaurant::Menus POST /restaurant/menus/ 店舗ログイン create
Failure/Error: expect(response).to have_http_status(302)
expected the response to have status code 302 but it was 200
# ./spec/requests/restaurant/restaurant_menus_spec.rb:133:in `block (4 levels) in <top (required)>'
Finished in 23.46 seconds (files took 6.76 seconds to load)
18 examples, 1 failure
Failed examples:
rspec ./spec/requests/restaurant/restaurant_menus_spec.rb:124 # Restaurant::Menus POST /restaurant/menus/ 店舗ログイン create
きちんとmenuがcreateされればリダイレクトされるはずなのになぜかステータスが200になってしまっておりました。
コントローラでmenuがsaveされなかったら render new されるようにしていたので、200が返って来ておりました。
パラメータを確認してみたら、どうやらネストさせているmenu_images_attributesのパラメータがうまくFactoryBotで作成できておりませんでした。。。
解決方法
以下のように、
image_params = { menu_images_attributes: [ FactoryBot.attributes_for(:menu_image) ] }
とネストされるパラメータを作成してから、それをmergeするように書き換えてあげたら無事テストが通るようになってくれました!!
context '店舗ログイン' do
    it "create" do
      sign_in no_menu_restaurant.restaurant_user
      image_params = { menu_images_attributes: [ FactoryBot.attributes_for(:menu_image) ] }
      post restaurant_menus_path, params: { menu: FactoryBot.attributes_for(:menu, :with_menu_images, restaurant_id: no_menu_restaurant.id).merge(image_params) }
      p params: { menu: FactoryBot.attributes_for(:menu, :with_menu_images, restaurant_id: no_menu_restaurant.id).merge(image_params) }
      expect(response).to have_http_status(302)
      expect(response.location).to eq(restaurant_menu_url(Menu.find_by(restaurant: no_menu_restaurant).id))
    end
  end
end
(modify/menu_image_create|✚1) [1] $
docker-compose run --rm app bundle exec rspec spec/requests/restaurant/restaurant_menus_spec.rb
Starting flatea_redis_1 ... done
Starting flatea_db_1 ... done
...........{:params=>{:menu=>{:name=>"menu_10", :description=>"description_10", :price=>5000, :restaurant_id=>2094, :menu_images_attributes=>[{:image=>#<Rack::Test::UploadedFile:0x000055c00b508d60 @original_filename="sample.jpg", @tempfile=#<Tempfile:/tmp/sample20190516-1-gi60xt.jpg>, @content_type="text/plain">}]}}}
.......
Finished in 24.28 seconds (files took 7.61 seconds to load)
18 examples, 0 failures
以下の記事を参考にさせていただきました!!!